Friday, August 26, 2016

Weekend Mani!

Hey everyone it's Friday! Every other weekend or so I do up my nails for the upcoming week. Some days I do my design directly onto my nails and other times I paint false nails and glue them on when they are dry, Today I want to share a quick and easy tutorial I'm doing for this weeks:
WEEKEND MANI!

To start with I use a base coat if I'm using my real nails. I'm using L.A. Colors Base/Top Coat. Using a good base coat is super important because it protects your nails and prevents staining.
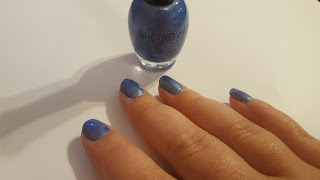
Next I paint two coats of Broadway Nails O! Jessica #8

Before it is finished drying I put a clear coat over both ring fingers only. Working quickly I put my diamonds in place. Diamonds are from Sassy+Chic 3N1 Nail Art Pen. I just use a cuticle stick with a bit of clear polish on the end to pick them up and place them on my nail. After all the diamonds are in place I put a top coat over the nail.


While my ring finger nails are drying I sponge Broadway Nails Paradise Water #45 glitter onto my remaining nails. Then I use my nail clippers to cut the edges of the diamonds off the end of my nails.   After everything is even with my nail I put a top coat over all of my nails and let dry.


I hope you all like my simple weekend nail and don't forget to follow me for more!  


Wednesday, August 24, 2016

Back To School Memory Book

Hello Everyone! Today my kiddos go back to school so I decided to share how I keep up with all of their precious memories. My second favorite part of school is when they bring home drawings and projects. My favorite will always be shopping for new school supplies. Every new school year when we shop for supplies I get a three ring binder for each of my little ones. It does not have to be a big binder or an expensive one. Although I do recommend one with a clear protector pocket in front so you can print there name, school, and grade on paper and then slip it right in the front with a picture of them. The binder size will depend on your preference as well as your child's grade level. I only keep what I can fit in my binder, unless its an art project. (Those I keep on a shelf.) I didn't heed my own advice.. this year the store sold out of the binder I usually get so I'm making do with this alternative until my binders are back in stock.
In the binder I put a pack of sheet protectors. I use the Avery ones here. (Pictured below) I usually buy one or two packs at a time and buy more as I run out. I prefer the sheet protectors as opposed to simply hole punching for several reasons. One its neater, even when the pages are different sizes you can fit them into one sheet and they are all uniform. Two they save space, you can use the front and back to display papers. And three it makes looking back so much easier because you won't rip through the pages. 
 I put everything in the sheet protectors the day it comes home, that way its all in order by date. Any oversized pages I put in the back and awards at the end of the year go in the front. I keep the current years binder right next to the homework station so I have no excuse for not putting pages in right away. If you like what you see and you decide to try it yourself send me pictures or comment below, I'd love to see what you come up with. And as always follow me for more!
Disclosure: All products mentioned in this post were paid for by me. I'm not being paid to endorse this product. All opinions are my own. 

Tuesday, August 23, 2016

My First Post

Hello internet and welcome to Miss Marie's Media!
I'm Marie and for the biggest portion of my life I've been obsessed with arts, crafts, writing, and creativity in general. I dont think I could go a day without some type of creative outlet! And that is what inspired me to create this blog! Its the perfect place for me to share my projects with amazing people like you! Please feel free to Follow my creative journey, like and share my Blog, tell your friends, and don't forget to come back for more!
I'll be posting writing i'm working on, craft projects i'm into, nail art designs, paintings I've done and lots of other creative DIY things! I look forward to seeing this blog grow and sharing my talent with many wonderful people. Hit the Follow button on the right for more!